Monday 29 October 2012

Autumn Engagement Card

Hi Bloggers,

Today I'd like to share an 8" x 8" engagement card I made.

I made the flowers using the patterned paper and the Flower Shoppe cartridge, inking the edges slightly. The leaves are also from the Flower Shoppe cartridge.


The large scallop heart and the engagement couple are from the Sweethearts cartridge. I embossed the cream heart with the Swiss Dots embossing folder and added a little ink to the edges.

I used a Martha Stewart punch to make border strips from cream and brown card, layering them.

I used my Gypsy to weld the letters from the Gypsy Font cartridge and added ribbon to the border strip.

Hope you like it.
Thanks for stopping by.
Pam xx

Sunday 28 October 2012

Cat Frame Birthday Card

Hi Bloggers,

Today I'd like to share a 6" x 6" card that I made with the Cindy Loo and Flower Shoppe Cricut cartridges.

It's very dimensional with some distressed edges for added texture.

Here's a close up of the cat.

The rolled flowers and leaves are on the Flower Shoppe cartridge.

I embossed the frame using the Swiss Dots embossing folder and my Bigshot.

I punched a border strip using a Martha Stewart punch and attached ribbon to the edge.
The font is from the Cricut Craft Room Basics cartridge.

Hope you like it.
Thanks for stopping by.
Pam xx

Saturday 27 October 2012

3-D Doily Birthday card

Hi Bloggers,

Today I'd like to share an 8" x 8" card that I made for a 30th birthday.
The main image is a doily from the Cindy Loo Cricut cartridge, but rather than just leaving it as a flat image, I've made it 3-D.
I was inspired by a similar idea some time ago (but now cannot remember where it was!) and have only just had chance to try it - so here it is...

I wanted to use autumnal colours as it's an October birthday and chose browns and red.
I used four shades of brown, some red, white and cream cardstock along with patterened paper.

I used my Gypsy to design the card and, as the Cindy Loo cartridge has separate (layered) images for the deer, squirrel and trees, it was easy to make them 3-D. I cut two doilies, one from very dark brown card and the other from cream. I cut (by hand) the centre from the cream doily to create a frame. The brown one was for the base.

I used gems for the eyes.
 

I used embossing folders to add texture to the trees and then layered them, adding gems as a finishing touch.

I chose swirl, dotty and bark designs of embossing folders.

The font is Cricut Craft Room Basics cut at 1/2"

I hope you like it.
Thanks for stopping by.
Pam xx

Saturday 6 October 2012

Published Layouts Part 3 (of 3)

Hi Bloggers,

Today I'd like to share my third (and final) layout published in Scrapbook Magazine issue 67 (on sale 4th October).

(My first and second layouts are featured on my last 2 blog posts).

Let It Snow:

I used bubble wrap to "stamp" a random pattern on the background paper using brown ink. I like the way this reminded me of snowballs - just like the one on the photo!

I tore the white and brown spotty paper to make snow mounds and made a snowman by drawing around 3 different size circles (overlapping them) - I drew around glasses and plastic tubs.
I cut a strip from the patterned paper for the snowman's scarf.

I cut narrow strips, approx 3/8" wide and used a 4-row weave pattern to create the woven background circle - I used a plate with a 9 1/2" diameter as a template for the circle shape.

I used plates again to create the circle frame for the outside edge of the woven circle. Then I used the alphabet stamps to stamp the title repeatedly around it.
I journaled on tags cut from the reverse side of the paper pack header sheet (an extra bonus in the paper pack) and added wellies cut from the patterned paper. then I tucked them behind the woven circle to create hidden journaling.

I also had a lovely surprise when I looked at the sketch page in the magazine - the sketch for this layout was there!

Hope you like my layouts.
Thanks for stopping by.
Pam xx

Friday 5 October 2012

Published Layouts Part 2 (of 3)

Hi Bloggers,

Today I want to share with you the second of my layouts published in Scrapbook Magazine issue 67 (on sale 4th October).

(I posted details of my first layout yesterday).

The Chapman Family:

I used lots of distressing on this layout.

I made a pleated photo mat with a scallop edge. I used 5p coins in repeat to make the scallops - I found it easier to do one strip and then use it as a template rather than lining up the coins over and over.

I drew around scallop pastry cutters (on the back of patterned paper), to make the flowers, using varying sizes for the layers. I hand drew a basic leaf shape and used it as a template for 3 leaves then I crumpled up all the flowers and leaves to distress them.

I journaled on strips of paper with the alphabet stamps and also journaled by hand on a long narrow border strip.

I made the title banner by cutting a 12" x 1" strip from patterned paper, cutting a "v" shape in each end (to mimic ribbon ends), and folding 3 pleats into each end.

Hope you like it.
I'll share my third layout with you tomorrow.
Thanks for stopping by.
Pam xx

Thursday 4 October 2012

Published Layouts Part 1 (of 3)

Hi Bloggers,
Whoop, whoop - My layouts are in Scrapbook Magazine (issue 67 on sale 4th October).
I made 3 layouts for the "Budget Challenge" and I am thrilled with the coverage.

The challenge was to make 3 layouts using only the materials I could buy for £10. I bought a paper pack, ink pad and set of alphabet stamps for a total of £9.78.

I thoroughly enjoyed finding alternative ways to create scallops, flowers and embellishments using household objects - bubble wrap, coins, pastry cutters, plates, dishes and glasses!!

I thought I'd share my first layout - MAGIC KINGDOM - today and then my second and third layouts over the next 2 days.

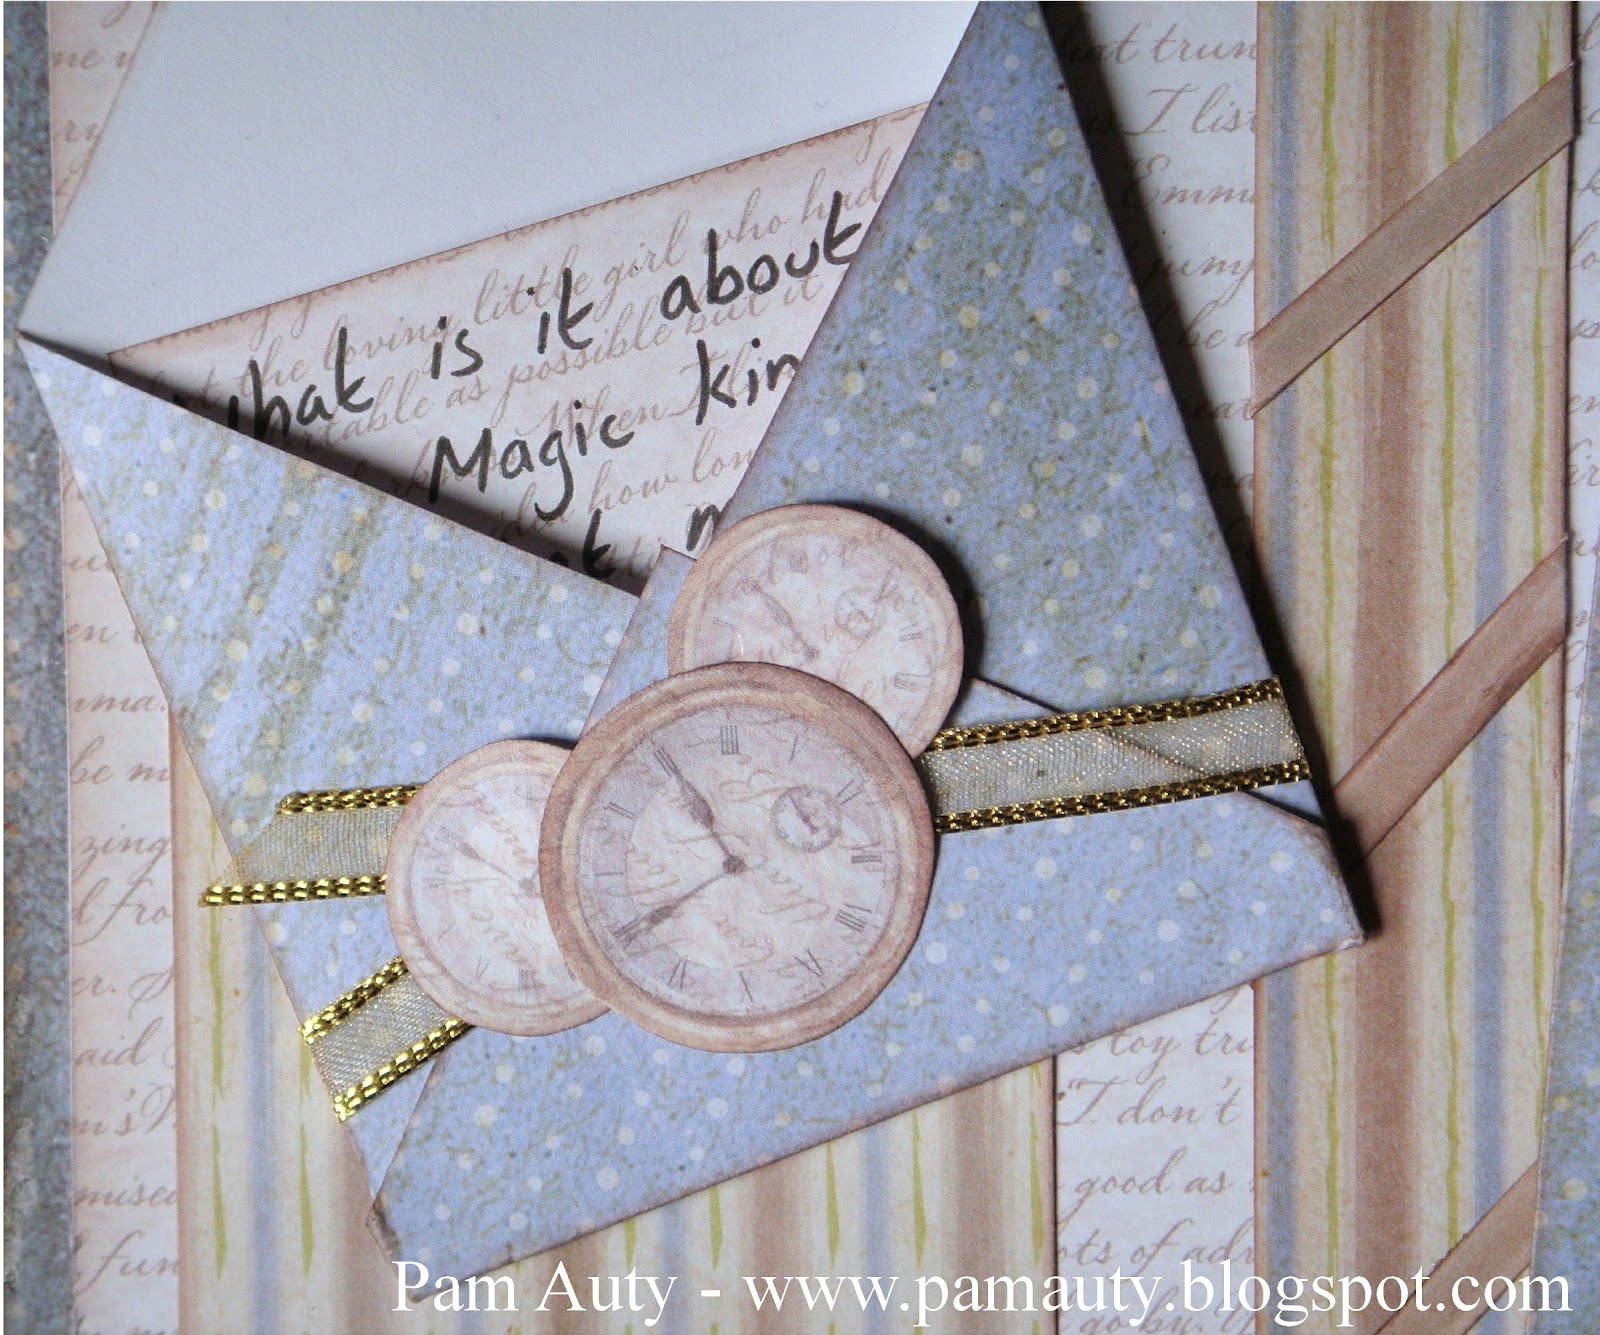
I cut pocket watches from the patterned paper to create a banner for the title, adding alphabet stamps and ribbon (saved from Christmas crackers).

The folded frame was made from a 9" square of patterned paper and embellished with clock faces (again cut from patterned paper) arranged in a "Mickey head design" to reinforce the Disney theme.

The larger frame was cut from stripe patterned paper. Then narrow brown strips were cut from the stripe paper and wrapped around the frame at an angle.

I made an envelope from a 4 1/4" square of patterned paper, embellished with a Mikey head as before and finished with ribbon.

Other embellishments were made from squares of patterned paper and varying sizes of Mickey heads as before.
Hand written journaling is on a piece of paper inside the envelope and I have used alphabet stamps on strips of paper to add further journaling.

Hope you like it.
I will share layout 2 tomorrow.
Thanks for stopping by.
Pam xx

Saturday 29 September 2012

Love Letter Layout

Hi Bloggers,

I was recently looking through some of my old scrapbooking "stash" and came across a few "Class-in-a-bag" kits. So I decided to have a play with one.

I changed things around a little bit - I turned the layout sideways and then the photo mat sideways (as I wanted to use a landscape photo) - and this is what I came up with:

I followed the instructions for the envelope, then altered it, adding ink and alphabet stamps.

I distressed the edges of the papers using a tool and plenty of ink. I also pierced holes along the edges, threading floss through some to add stitching.

More stitching was added to the photo mat and I cut a triangle from patterned paper, placing it on the corner of the background card.
I cut individual letters from the pattrned paper and stuck them randomly over the background card.

I used a metal ribbon slider from my stash with strips of the card. I just love metal embellishments!

I enjoyed playing with this kit and will be trying more in the future.

Hope you like it.
Thanks for stopping by.
Pam xx

Thursday 20 September 2012

Cricut Class

Hi Bloggers,

Now that my class is over I thought I'd show you the cards that I designed for the day.

The first card measures 8" x 8" and uses the standard cartridges that come with the Expression machine.

I used a number of the modes and functions of the Expression to make the card.
Fit to page......
 Fit to Length....
Cartridge Creative features.....
Flip and Repeat Last......
Quantity.....
And for those with a Create machine.......
An 8" x 8" card using Center Point, Real Dial Size, Flip, Repeat Last and Auto Fill.

Hope you like them.
Thanks for stopping by.
Pam xx