Friday 9 December 2011

Noel Card

Hi Bloggers,
Today I wanted to share with you a card inspired by Tim Holtz Tag 1. (Tim's Tag here)
I don't have many of Tim's dies so I used my Cricut and Gypsy.


The background is using the Snowflakes Cuttlebug embossing folder.

I made the pinecones using one of the spiral flowers from the Cricut Flower Shoppe cartridge.
The branch and holly leaves are a mixture of images from the Cricut Christmas cartridge and a Martha Stewart branch punch.


I welded letters together using my Gypsy and cut them from brown card before covering with copper coloured glitter (using Blackletter cartridge - one of my favourites!).


I hope you like it.
Thanks for stopping by.
Pam xx

Friday 2 December 2011

Snow Scene Easel Card

Hi bloggers.
Just a quick post to show you the card versions of my winter scene layout (the layout is my previous post).
Most of the techniques are the same but I used Artemio snowflake stamps (I made the cards before I purchased the Cricut Cuttables Stamp Material that I used in my layout).


Close up of details.


Same card design but using a snowman instead of the reindeer.


Hope you like them.
Thanks for stopping by
Pam xx

Monday 21 November 2011

Snow Scene Winter layout

Hi Bloggers,
The layout that I want to share with you today was made using some snowflake stamps that I made from the "Cricut Cuttables Stamp Kit" (how cool is that?).


For the background I cut 2 sizes of snowflakes and stamped them at random on a 12" x 12" sheet of white card using VersaMark. I then added clear embossing powder and heat set them.
When I blended distress ink over the top the snowflakes resisted the ink.

I used the same stamps to make another random snowflake pattern inside the large blue circle, but this time I used blue ink.
Then I CUT the same number and size of snowflakes to match this random pattern, using my Cricut and white card.
I placed the cut out snowflakes on top of the stamped snowflakes offsetting them slightly.

The snow mounds are made from torn paper with puff paint and glitter highlights. I used the same puff paint and glitter to create snowy branches on the trees.


I cut the reindeer with my Cricut and embossed it with the Cuttlebug snowflake embossing folder, sanding the top layer.

The large lacey scallop frame was made using my Gypsy and covered with Rock Candy Distress Stickles.

I hope you like my layout. Please feel free to leave a comment.
Thanks for stopping by
Pam xx

Tuesday 8 November 2011

Bonfire Night Mini-book

Hi Bloggers.
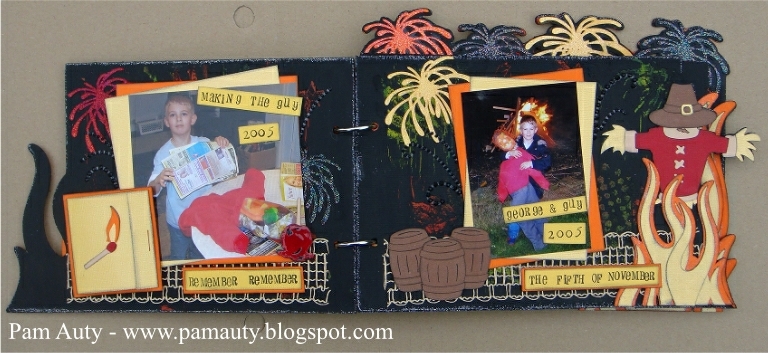
I have made a mini-book to celebrate the great English tradition of Bonfire Night.
I love the crackling fire, the smell in the air and the crisp chill.
I love making the Guy, the fireworks and warming up by the fire eating pie 'n' peas.
Yes, I think it's safe to say..... I love Bonfire Night.

My mini-book was designed using my Gypsy and has the "Remember, Remember" rhyme running through the pages.

I used a crackle paint technique to make the cover and backgrounds (I was inspired by a recent project by Michelle Jackson-Mogford using this technique).

The book title is cut from yellow and orange card. I used a firework stamp (that I made using some Cricut Cuttables stamping material)  to stamp and emboss a random glittery design on the letters and also to create a pattern within the cracked background.


As Guy Fawkes was to be the one to light the fuse, I thought of using a "matchbox" to journal inside.

All the flames throughout the book are covered in Rock Candy Distress Stickles and I like the way they twinkle. it reminds me of flickering flames.
I made a Guy using one of the scarecrows from the Simply Scarecrows Cricut Cartridge and a hat from Paper Dolls (adding a buckle).
I wanted the edges of the pages to sparkle so I embossed them with a glittery embossing powder.
The firework embellishments were cut using my Cricut and embossed with glittery embossing powder.
There you have it. My Bonfire Night mini-book.
Thanks for stopping by.

Pam xx

Monday 24 October 2011

Mad Hatter Halloween Layout

Hello bloggers.

Here's a Halloween layout I designed using leftovers from a hat made for my son last year (when he dressed as the Mad Hatter).

I used my Gypsy to design the large hat for my layout and cut it from black card using my Cricut.
Then I covered it with some of the leftover lace tablecloth and sprayed it with various paints.
The peach scarf started out as a white sheet and was also coloured with paint.


I used hat pins from my craft stash to mimic the vintage hat pins.


Leftover lace and snippets from the wig made great personal embellishments.


I hid the journaling behind one of the smaller photos.


I really enjoyed using all the leftover materials for this layout and will be doing more of it in the future.

Thanks for stopping by

Pam xx

Monday 17 October 2011

Thank You Cards

Hello bloggers,
I've had a little break from my autumn projects to make some thank you cards.
I'm pleased with the way this design turned out and I just know I will return to it again.
The most difficult part will be deciding which colour option to choose...

Green...
or pink...

or lemon.


What do you think?

Pam xx

Friday 14 October 2011

Beware Halloween Layout with the Cricut Gypsy

I love autumn.
I think of conkers and string, of turnips, Mischievous Night, Bonfire Night and runny noses.
I love the colours, the sound of leaves under my feet and the chill on my face.

Traditions are different today than when I was growing up. Especially "Trick or Treat" which is no longer on Mischievous Night but now on Halloween. We have embraced this new tradition. I personally welcome the pumpkins - they're so much easier to carve than turnips!

For the last 10 years or so we have dressed up at Halloween and had great fun.


Here's a double page spread I designed using my Cricut and Gypsy.


A close-up of a frame and border strip


Cricut cartridges used: Happy Hauntings, October 31st and George and Basic Shapes

Please feel free to leave a comment, they're always welcome

Pam xx

Monday 10 October 2011

"Engaged In Barbados" mini-book

Good evening bloggers.
I made this mini-book to remind my hubby and me of our fantastic holiday in Barbados (many years ago) when he proposed to me.
The holiday was very special and I wanted to create a book that would be just as special and unique.
So, I used my Gypsy to make a one-off design from the cover and inserts to the page tabs, photo mats, borders, tags, titles and flowers.
Then I used my Cricut to cut the designs from patterned paper, card, chipboard, grungepaper and acetate.


Once I had designed the shape and size of my book, I cut the cover from chipboard and the embellishments from grungepaper.


The Gypsy is perfect for sizing mats. I used it to size the scallop circles behind the journaling spots.


I designed scallop borders to use throughout my book. they also work well as the edges on journaling strips.


I made plenty of pockets for hidden journaling and extra photos.
Hope you like it
Pam xx

Sunday 2 October 2011

baby boy card

Good evening bloggers, I hope you're not melting too much in this heat.
I've uploaded a card I made for a baby boy, enjoy
Pam xx

Sunday 18 September 2011

New Blogger

Welcome to my crafty blog. I will soon be posting cards and scrapbook pages I have designed. I hope you like them.
Pam xx