Hi Bloggers,
I'd like to share a couple of cards I've made using a gorgeous Lili of the Valley stamp I bought some time ago.
The first card has the stamped image coloured with pale pink Promarkers.
The flowers are made using my Cricut and the Flower Shoppe cartridge, with a mixture of leaves from both the Flower Shoppe and Everyday Paper Dolls cartridges.
I used Martha Stewart punches to make the lovely pattern around the mat (I just love this design) and a stamp for the greeting.
The second card has been coloured with brighter reds and oranges.
The flowers are from the Flower Shoppe cartridge again, but are a different style of flower with a button and twine in the centre.
The frame is from the Holiday Cakes cartridge.
Hope you like them.
Thanks for stopping by.
Pam xx
Thursday, 26 April 2012
Monday, 16 April 2012
Published Layout
Hi Bloggers,
Whoop, whoop I'm so excited.....I've had another layout published in "Scrapbook Magazine". This one is in issue 63 out this week.
It's a digital layout I made using Serif Craft Artist software and the following digikits:
Modern Lace, Comic Book, Vintage Vehicles, Cheers, Showtime, Back to School and Diamond Hearts.
The car badges were made using the "cut-out" feature of the software and I also used the software to alter colours and add effects.
I love Scrapbook Magazine and urge you to get yourself a copy, it's full of great inspiration.
Pam xx
Whoop, whoop I'm so excited.....I've had another layout published in "Scrapbook Magazine". This one is in issue 63 out this week.
It's a digital layout I made using Serif Craft Artist software and the following digikits:
Modern Lace, Comic Book, Vintage Vehicles, Cheers, Showtime, Back to School and Diamond Hearts.
The car badges were made using the "cut-out" feature of the software and I also used the software to alter colours and add effects.
I love Scrapbook Magazine and urge you to get yourself a copy, it's full of great inspiration.
Pam xx
Sunday, 15 April 2012
Buckingham Palace Double Page Spread
Hi Bloggers,
I was very pleased to be asked, by local artist Sally Butler, to design a layout using her new "Diamond Jubilee Collection".
This collection is available exclusively at It's Crafting Time in Cambridgeshire, and was designed by Sally to coincide with the Queen's Diamond Jubilee.
I chose to make a double page spread of our visit to London.
I teamed the papers with red and blue cardstock which I distressed with a distressing tool and Distress Ink (in faded jeans and Barn Door). Then I used a pen for faux stitching on the blue cardstock and a brick stamp to create a pattern on the red cardstock.
I also used border and corner punches on the patterned paper.
The large photo mats were cut with my Cricut using the Base Camp cartridge.
I added rings in red,white and blue along with twine and images cut from the patterned paper.
I clustered embellishments cut from the patterned papers with journaling spots and flowers (made from plain cardstock and the patterned papers using the Flower Shoppe Cricut cartridge).
The centres of the large brads are filled with images cut from the patterned papers and sealed with glossy accents.
The small flower clusters in the bottom left of both layouts were made in the same way with mini-brads in the centre.
I cut alphabet tiles from the alphabet sheet and inked the edges with distress Ink. I also highlighted the letters with glossy accents and cut Union Jack images from the border sheet, to act as a mat for the first and last letters.
for the word "London", I cut the letters from the alphabet tiles and also highlighted them with glossy accents.
I love how this turned out, hope you do too.
Pam xx
Materials and tools:
Diamond Jubilee Collection by Sally Butler
Blue and red cardstock
Brick stamp by Prima
Martha Stewart punch-around-the-page in Swirling lace
Cricut cartridges Base Camp, Flower Shoppe, George and Basic Shapes
Distress ink in Faded Jeans, Barn Door and Black Soot
Baker's twine, brads, glossy accents
I was very pleased to be asked, by local artist Sally Butler, to design a layout using her new "Diamond Jubilee Collection".
This collection is available exclusively at It's Crafting Time in Cambridgeshire, and was designed by Sally to coincide with the Queen's Diamond Jubilee.
I chose to make a double page spread of our visit to London.
I teamed the papers with red and blue cardstock which I distressed with a distressing tool and Distress Ink (in faded jeans and Barn Door). Then I used a pen for faux stitching on the blue cardstock and a brick stamp to create a pattern on the red cardstock.
I also used border and corner punches on the patterned paper.
The large photo mats were cut with my Cricut using the Base Camp cartridge.
I added rings in red,white and blue along with twine and images cut from the patterned paper.
I clustered embellishments cut from the patterned papers with journaling spots and flowers (made from plain cardstock and the patterned papers using the Flower Shoppe Cricut cartridge).
The centres of the large brads are filled with images cut from the patterned papers and sealed with glossy accents.
The small flower clusters in the bottom left of both layouts were made in the same way with mini-brads in the centre.
I cut alphabet tiles from the alphabet sheet and inked the edges with distress Ink. I also highlighted the letters with glossy accents and cut Union Jack images from the border sheet, to act as a mat for the first and last letters.
for the word "London", I cut the letters from the alphabet tiles and also highlighted them with glossy accents.
I love how this turned out, hope you do too.
Pam xx
Materials and tools:
Diamond Jubilee Collection by Sally Butler
Blue and red cardstock
Brick stamp by Prima
Martha Stewart punch-around-the-page in Swirling lace
Cricut cartridges Base Camp, Flower Shoppe, George and Basic Shapes
Distress ink in Faded Jeans, Barn Door and Black Soot
Baker's twine, brads, glossy accents
Tuesday, 10 April 2012
Music Inspired Birthday Card
Hi Bloggers,
I made a card for a good friend of mine that I'd like to share with you.
The mats were cut using the Elegant Edges Cricut cartridge and I used a music stamp to create the background pattern on the white layer (with Victorian Velvet Distress Ink).
I cut the pianist from the Quarter Note cartridge and embossed the top layer with a swirl design.
The flowers and leaves are from the Flower Shoppe cartridge. I shaped and layered them before adhering to the card.
I covered the swirls and text with glossy accents and also added Stickles glitter glue on the burgundy mat and brad.
Hope you like it.
Thanks for stopping by.
Pam xx
I made a card for a good friend of mine that I'd like to share with you.
The mats were cut using the Elegant Edges Cricut cartridge and I used a music stamp to create the background pattern on the white layer (with Victorian Velvet Distress Ink).
I cut the pianist from the Quarter Note cartridge and embossed the top layer with a swirl design.
The flowers and leaves are from the Flower Shoppe cartridge. I shaped and layered them before adhering to the card.
I covered the swirls and text with glossy accents and also added Stickles glitter glue on the burgundy mat and brad.
Hope you like it.
Thanks for stopping by.
Pam xx
Thursday, 5 April 2012
Train Station Layout
Hi Bloggers,
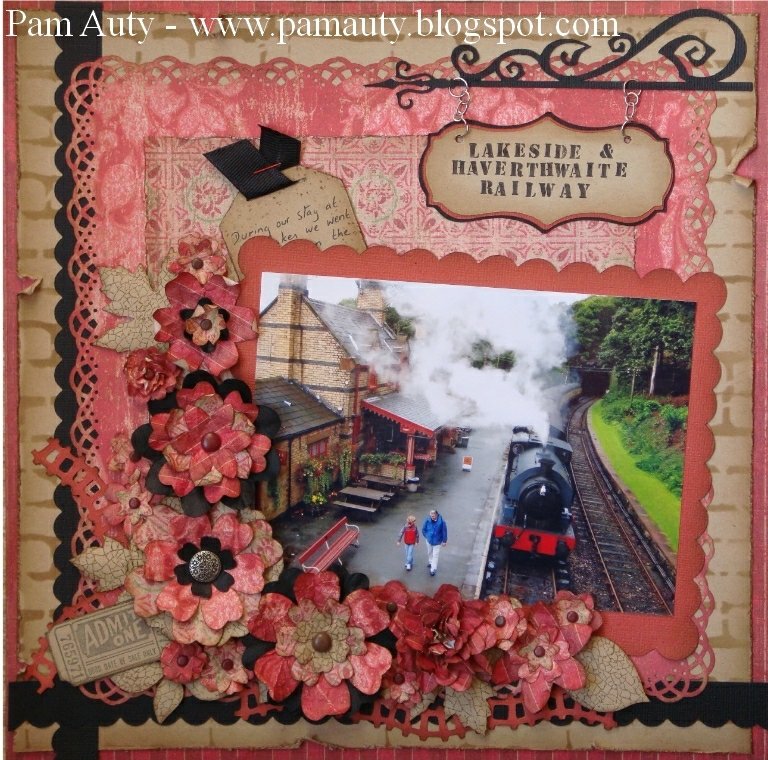
Today I would like to share with you a layout I made from our trip to The Lakes in Cumbria (UK).
The scenery there is so picturesque and I just adore this photo of my husband and son on the platform at Haverthwaite Station.
For the second background layer I inked through a mask with a brick pattern and for the third I punched the edges.
I made a sign for my title using my Gyspy and Cricut. I stamped the text and used jump rings with chain links to "hang" it up.
The two black scallop border strips were designed on my Gypsy and cut with my Cricut. The scallop photo mat was also made this way.
I cut a tag for my journaling and tucked it behind the photo mat.
I designed small train tracks on my Gypsy and arranged them amongst the flower clusters.
All the flowers and leaves were cut from the Flower Shoppe cartridge.
I distressed and shaped the flowers adding brads to the centres.
I stamped the leaves with a crackle design before shaping.
Hope you like it.
Thanks for stopping by.
pam xx
Today I would like to share with you a layout I made from our trip to The Lakes in Cumbria (UK).
The scenery there is so picturesque and I just adore this photo of my husband and son on the platform at Haverthwaite Station.
For the second background layer I inked through a mask with a brick pattern and for the third I punched the edges.
I made a sign for my title using my Gyspy and Cricut. I stamped the text and used jump rings with chain links to "hang" it up.
The two black scallop border strips were designed on my Gypsy and cut with my Cricut. The scallop photo mat was also made this way.
I cut a tag for my journaling and tucked it behind the photo mat.
I designed small train tracks on my Gypsy and arranged them amongst the flower clusters.
All the flowers and leaves were cut from the Flower Shoppe cartridge.
I distressed and shaped the flowers adding brads to the centres.
I stamped the leaves with a crackle design before shaping.
Hope you like it.
Thanks for stopping by.
pam xx
Monday, 26 March 2012
Down by the Sea
Hi Bloggers,
We've been enjoying some lovely sunshine here in the UK over the last few days and it's put me in a summer mood.
So, I thought I'd share with you this beach layout I made a little while ago.
I love the photo of my son jumping out of the sand and, if you look closely enough, you can just make out "Blackpool Tower" in the background.
I used my Gypsy to design the large fancy edged circle and the irregular scallop border, cutting them both with my Cricut.
The sand in the bucket is cut using a sand design patterned paper (cool huh?).
The title was cut using my Cricut and the "Life is a Beach" cartridge (I cut off the attached lighthouse).
I added magic mesh and raffia to my layout to emphasize the beach theme.
Thanks for stopping by
Pam xx
We've been enjoying some lovely sunshine here in the UK over the last few days and it's put me in a summer mood.
So, I thought I'd share with you this beach layout I made a little while ago.
I love the photo of my son jumping out of the sand and, if you look closely enough, you can just make out "Blackpool Tower" in the background.
I used my Gypsy to design the large fancy edged circle and the irregular scallop border, cutting them both with my Cricut.
The sand in the bucket is cut using a sand design patterned paper (cool huh?).
The title was cut using my Cricut and the "Life is a Beach" cartridge (I cut off the attached lighthouse).
I added magic mesh and raffia to my layout to emphasize the beach theme.
Thanks for stopping by
Pam xx
Tuesday, 13 March 2012
Easter Egg Hunt Invitation
Hi Bloggers,
Today I would like to share with you an invitation I made for an Easter Egg Hunt.
I was asked to make a shaped card but did not have a suitable image. So I designed my own using my Gypsy and based it on an image from the Simply Charmed cartridge.
The chick pulls out from the egg.
Most of the designs were made up of basic shapes.
The chick was an egg shape from the Gypsy Wanderings cartridge, along with ovals from the George and Basic Shapes cartridge.
This is a close up of the shapes that make up the chick design:
This is a close up of the actual cut lines:
Same for the feet. This is a close up of the shapes that make up the design:
This is a close up of the actual cut lines.
The eyes and beak were circles and a triangle.
The cracked egg was made using a half circle shape from the Gypsy Wanderings cartridge (I had to use the "hide" feature to hide parts of the design) with triangles cut from the top edge. The triangles are from the George and Basic Shapes cartridge.
Once cut, I embossed the cracked egg with the Swiss Dots Cuttlebug embossing folder.
I hope you like it.
Thanks for stopping by.
Pam xx
Today I would like to share with you an invitation I made for an Easter Egg Hunt.
I was asked to make a shaped card but did not have a suitable image. So I designed my own using my Gypsy and based it on an image from the Simply Charmed cartridge.
The chick pulls out from the egg.
Most of the designs were made up of basic shapes.
The chick was an egg shape from the Gypsy Wanderings cartridge, along with ovals from the George and Basic Shapes cartridge.
This is a close up of the shapes that make up the chick design:
This is a close up of the actual cut lines:
Same for the feet. This is a close up of the shapes that make up the design:
This is a close up of the actual cut lines.
The eyes and beak were circles and a triangle.
The cracked egg was made using a half circle shape from the Gypsy Wanderings cartridge (I had to use the "hide" feature to hide parts of the design) with triangles cut from the top edge. The triangles are from the George and Basic Shapes cartridge.
Once cut, I embossed the cracked egg with the Swiss Dots Cuttlebug embossing folder.
I hope you like it.
Thanks for stopping by.
Pam xx
Subscribe to:
Posts (Atom)