Monday, 3 June 2013

Cricut Sample Fonts

Hi Bloggers,

I don't know about you, but when I'm searching for the perfect Cricut font to match my project, I often struggle to visualise the font from the images in the handbooks.

I came up with this idea:


I cut strips of white card 12" x 1 1/2" and punched a hole in the corner so they would hang up.
I cut letters to spell the name of the Cricut cartridge used, along with any shadows and variations. I also cut samples of the numbers on the cartridge.
As much as I could I tried to cut them all at 3/4" so I had a good comparison. Some I had to cut larger because they were intricate.

Spelling the name of the cartridge made it a very easy and quick reference.
Here is a picture of some of the strips.

Here's a close up.

I threaded a book ring through the holes and then it was ready to hang up.

I still have some cartridges to do so it's very much a work in progress. I can also add to it as I purchase more cartridges and it's a great way to use up scraps of card.

I hope you like my idea.
Thanks for stopping by.
Pam xx

Sunday, 12 May 2013

Wine and Flowers 40th Birthday Card

Hi Bloggers,

Today I'd like to share a card I made for a 40th Birthday.

The large frame is from the Cricut Elegant Edges cartridge and the letters are from the Mickey Font cartridge. I covered the letters with Glossy Accents.
I stamped the wine bottle and glass, and coloured them using Promarkers. I also used Glossy Accents on the "wine" sections.

I cut several flowers from the patterned paper and layered them as shown, creating a cluster of 3 in the top right of the frame. I also applied some Ranger Liquid Pearls in the centre of the flowers, and on the centre of the flowers on the background.

Here's a close up of the flowers to show the layering.

Hope you like it.
Thanks for stopping by.
Pam xx

Wednesday, 17 April 2013

Stamped Elegant Lady Card

Hi Bloggers,
Today I’d like to show you a card I made using the gorgeous “Elizabeth Bennet” stamp by IndigoBlu.
I started off by randomly stamping Honeycomb and Crackleglaze background onto the base card (6” square). Then I added Fran-tage glitter glass in black to the edges. This glitter glass is STUNNING!! The glitter chunks are quite large and add so much texture.
Then I cut a 5.25” mat from white card, using the Cricut Elegant Edges cartridge (I also cut the matching shadow from black card). I stamped the “Elizabeth Bennet” image onto the centre of the white mat and coloured the flowers, butterfly, bird and leaves with Promarkers.
The tag is cut from white card using the Cricut Wrap It Up cartridge and stamped with a greeting from a Personal Impressions set. I added Fran-tage glitter glass around the edges.
The flower is from the Cricut Flower Shoppe cartridge and the branches are a Martha Stewart punch (I really must stop using these on all my projects!!).
I tried to take some of the photographs in sunlight in the hope that it would better show the effect of the glitter glass.
Thanks for stopping by.
Pam xx

Wednesday, 10 April 2013

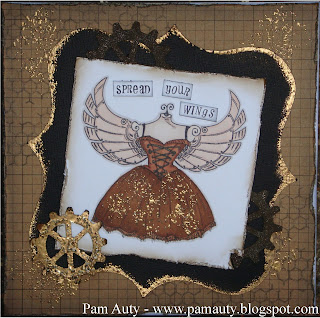
Spread Your Wings Card

Hi Bloggers,
Today I’d like to share a leaving card that I made for a colleague at work.
I chose a Kraft card for the background that had a grid pattern on it. Then I stamped a honeycomb pattern randomly in two opposite corners.
I used a Fran-tage Embossing Enamel to create the molten gold effect – my current obsession!!!
The large mat is cut at 7” using the Cricut Elegant Edges cartridge and I used the same Fran-tage Embossing Enamel around the edges.
The cogs were cut at 2” from the Cricut Paper Lace 2 cartridge. I covered one with Distress Embossing Powder (love the texture!) and the other with the Fran-tage Embossing Enamel sprinkled with Fran-tage Glass Glitter in Champagne. As the enamel melts, the glitter becomes embedded and the enamel acts as glue – it’s gorgeous!
The main image is made using 3 stamps. First, I stamped the dress. Then I masked it and stamped both the wings.
I used Promarkers to colour the image and sprinkled Fran-tage Embossing Enamel on the skirt.
The text is made using tiny letter stamps.
Hope you like it.
Thanks for stopping by.
Pam xx  

Tuesday, 9 April 2013

Wedding Invitations

Hi Bloggers,
I think it’s safe to say I’ve been somewhat busy these last few months!! I’ve been making projects that I cannot share on my blog.
However, today I can share the wedding invitations that I made for my ex-boss. The design is based on the “Autumn Engagement Card” that I made for her. I scaled the design to 6”x6” and changed the image of the couple.
I made 50 invitations and, because of some of the intricacies, I spent close to 200 hours making them.
From this:
To this:
Here's a close up of the rolled flowers:
The background patterned paper is from Bo Bunny and the plain card is Bazzill.
I used the following Cricut cartridges: Flower Shoppe, Sweethearts, Wedding and Gypsy Font.
I also used a couple of Martha Stewart punches, Distress Ink and a Swiss Dots embossing folder.

Thanks for looking.
Pam xx